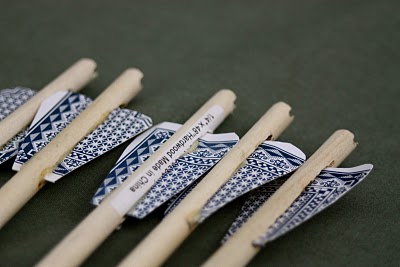
Because I received two requests for arrow- and quiver-making instructions within 10 minutes of my Robin Hood post (and because I’m snowed in on this lovely, icy, Sunday morning!), I’m posting a quick tutorial!
How to turn your 3-year-old into Robin Hood:
1. Buy two 1/4″x48″ dowel rods at your local hardware store.
(I believe this cost well under $2.00)
2. Pull the Jokers out of the nearest deck of cards (who needs em anyway?)

3. Cut each rod into 3 15″ lengths (to make a total of 6 arrows – you’ll have about 3″ leftover)
4. Cut each Joker into quarters, then shape each of the quarters to look like fletching
(shown below)
**For the next two steps you’ll need to use a Dremel tool with a rotary disc attachment (if you don’t have a Dremel, I’m not sure what to suggest – Ryan is the woodworker in the house and he’s at the grocery store right now – good man, eh?)
5. Mark on your arrow the length of your fletching and Dremel out a slit for it to slide through.
(shown below)
6. Also with the Dremel, make a notch at the back of the arrow for your arrow to rest on your bow (I’m sure there are more technical names for some of these things…)
(shown below)
7. Now slide the fletching (card) into the slot, secure it with some Gorilla Glue (or whatever glue you have around the house) and let it dry.
8. For the quiver, a Lays Stax can works great because it’s plastic and durable. Just take the label off (make your own label/crest on it if you like!) and with a sharp knife, cut two slits in the can wide enough to run your strap through. (We used a ribbon belt for Oliver because it’s adjustable – I’m sure you could use other things too!)
So, there you have it – a quiver and six arrows
for the cost of two dowel rods and a can of chips!
The boys have planned to do something about the tips/heads of the arrows, but so far the weather has prevented us from venturing that far away from our house. We’re thinking some small foam/styrofoam balls and a bit of glue could do it. Any other suggestions? (Y’all always have great ideas for stuff like this in my comments – I love that!)
Oh, and the bow is not homemade. It was a gift from Oliver’s Grandma and Grandpa – I think you can find them at WalMart and they come with three arrows with suction cup tips. (These arrows broke really quickly which is what necessitated our little wooden arrow project!)
Oh, and I’d love to know if you do this project. I always love to see!
Blessed Sabbath, friends!
“Behold, children are a heritage from the LORD,
the fruit of the womb a reward.
Like arrows in the hand of a warrior
are the children of one’s youth.
Blessed is the man
who fills his quiver with them!
He shall not be put to shame
when he speaks with his enemies in the gate.”
Psalm 127:3-5


>If you had some unused makeup wedges lying around they might work. They are kinda arrow shaped and still harmless =)
>Such a great, clever idea!
>THANK YOU! I will forward this to my dad to make for my boys, as he's the bow hunter in the family :)
We made these for our 4 year old son as a home made christmas gift. We used pencil erasers for the tips, you know the ones that come in a pack that you just pop on top of the pencil. They fit on top of the dowel perfectly. We also made a bow using a pice of pvc and some sting. Works great, even our 18 year old loves it!
Surely this isn’t just for boys! My daughter loves to play with “little boy” toys. Just something to keep in mind.