So, remember way back in July when I asked you all what you wanted me to post about and there was an overwhelming vote for a headband tutorial? Well, four months later I’m finally making good on my promise! (Can having a babe in arms be an excuse?)
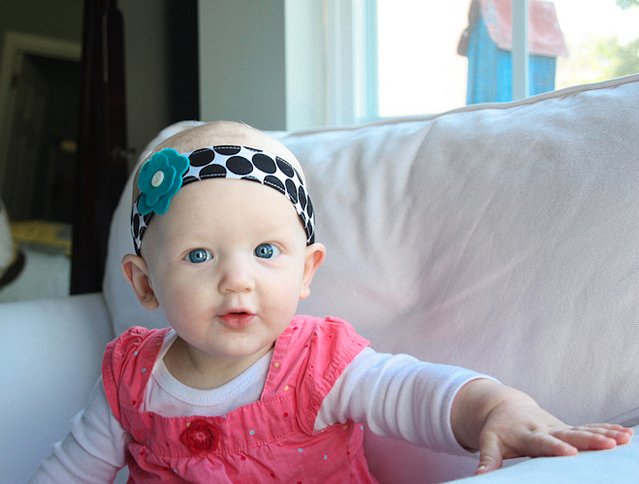
I spent my morning sewing and photographing my way through the manufacturing of a headband just like the one pictured below on miss bright eyes and now, sixty photos later, we’re ready to roll.

So, to get started, you need a strip of fabric. Hazel is 7 months old and her head measures about 17″. I’m basing these measurements on her, so you’ll have to adjust things a little depending on the size of the head you intend to band.
For Hazel, I cut a strip of fabric 18″x2.5″.
For babies with bigger or smaller heads, you only really need to adjust the length and not the width. For an adult, you’ll want to make it a little wider.
Yes, it’s going to be that kind of tutorial. The kind where I quite literally photographed every step of the process in gruesome detail. I intend to make your retinas bleed.
So, cut your strips. If you ask me, cut several and make a ton at once. It’s pretty simple and you can be a headband making factory for the afternoon and have great baby shower gifts or stocking stuffers to show for it.
Now it’s time to turn in the unfinished edges. If that’s enough explanation for you, then you can skip the next seven photos. But if you’re not sure, I’m going to walk you through it nice and slow. Because I care.
(while you iron it’s nice to keep a spray bottle nearby to keep your fabric wet. It helps with the pressing – makes it stay better and keeps your fabric from burning. Key.)
Alright, turn one long edge of your fabric strip up 1/4″ and press (and spray!) as you go.
It should look like this when you’re done.
Now, turn that same edge in another 1/4″.
Check. Now do the same on the other long edge of your strip. Turn it in 1/4″.
And then again, 1/4″.
This will conceal all the raw edges on the long sides.
Now, your strip should look like this. As you can see, I tapered the ends of mine just a little by turning them in a little more than 1/4″ on the ends. The headband just doesn’t need to be as wide on the back of the head as it is on the top.
Should I have told you about the tapering a little earlier?
No worries, it is definitely not a deal breaker.
Okay, time to sew. We’re going to run a stitch along each long side very close to the edge.
You can see here how small my seam allowance is. Tiny. It doesn’t have to be. I just like it that way. What matters more is that your line is straight. That is KEY.
Okay, so stitch your way down the length of fold of your strip.
Do the same on the other side.
Snip all your unruly strings.
I feel strongly about two things when I’m teaching someone to sew:
1. snip your strings as you go.
2. press the dickens out of whatever your making with each step. If you don’t, whatever you’re making is going to look homemade. It just is.
Ha. You can see my feet in that picture…
Okay, now more sewing.
With right sides together, align raw edges.
(I swear, if this was a real sewing pattern, that’s exactly what that step would say.)
But really, do line up the raw edges with the wrong sides facing out.
Like so.
(How would you have felt about me if instead there I’d written, “Like sew.”?)
Now stitch away again. a 1/4″ seam allowance really is plenty here.
Don’t judge me for not concealing this seam. I’ve tried and it just makes things too bulky with the elastic.
Snip snip!
If you’re wondering how I managed to photograph both of my hands at the same time (which you’re probably not), I used a timer. I do not have three hands and I did not activate the shutter with my tongue.
Press.
Now we’re getting somewhere! Do you feel awesome!?
Now, let’s add elastic.
Cut a piece of 1/2″ elastic (or whatever reasonable size you have laying around) to about 4″ long.
This is where things get a little trickier, so hang with me and I’ll do my best to make it clear.
Find the center of the piece of elastic and align it with the inside seam of the headband.
In other words, center the elastic on the inside of the headband.
Now press the very center down with one thumb and while holding the elastic securely in place, stretch one half as far as you can up the headband.
(see below how the left side of the elastic is at rest and the right side is being stretched? That’s what you need to do.)
Okay, while it’s stretched, hold your place with the elastic with your right hand and let go of the center with your left.
You’re giving yourself a starting point for attaching the stretched elastic.
Now, with great confidence, approach your sewing machine, holding you elastic in place.
And the first thing you should do is advance your needle so it’s completely in the “down” position, thus tacking your elastic to your fabric.
Now breathe and let go. Just for a second. (Or, you know, skip this step. It’s not critical.)
Okay, now pull your elastic taut. But ONLY EVER if it’s being tacked in place by the needle.
Now, keeping the elastic pulled tight, stitch it down to the fabric.
Definitely backstitch before you get going too far.
You’ll probably need to help advance the fabric by pulling it from the back because of all the tension.
You can also just pull it tight and tack it in place in the center with your finger. That’s also cool.
If you need to take a break halfway through, feel free. But – say it with me – ONLY IF THE NEEDLE IS DOWN!
Now, finish up. And of course, backstitch.
In the name of not losing you all as friends, I’m not going to post another picture of me snipping threads. But, snip your threads, just the same.
Okay, now how awesome do you feel??
Does your headband now
look something
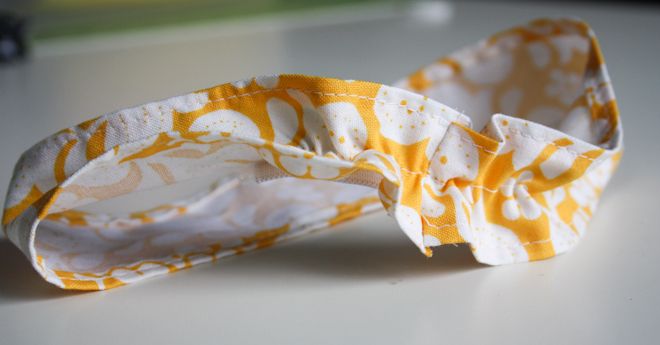
like this?
Here’s what the elastic should now look like. See how some of my stitches are a little uneven? It happens. It’s because it’s tricky to keep even tension and let the machine maintain a stitch length. I’m at peace.
Now, you can definitely stop here. A headband without accouterment is a-okay in my book.
But, if you’re feeling lucky, we can press on to the lovely world of wool felt joy.
(I ordered my very lovely wool felt from lit’l brown bird a year ago and it’s the best felt I’ve ever used. Makes that stuff at WalMart look like one of those green cleaning sponges. Buttery.)
Go ahead and pick a color palette.
Now last time I made a headband, I topped it with a flower. Cut freehand. No worries.
This time, we’re going with a circle. Just for fun.
You can still cut it freehand. (And I really mean that.)
Or, you can employ one of these bad boys.
It’ll rock the socks out of your circles, making each one perfectly and evenly smaller than the next.
You really can do without this. It’s just a fun gadget that I justified purchasing last Christmas when we were making all our gifts by hand and I wanted to make these lovely softie dolls.
Okay, cut out your circles. One, four whatever. I cut out four.
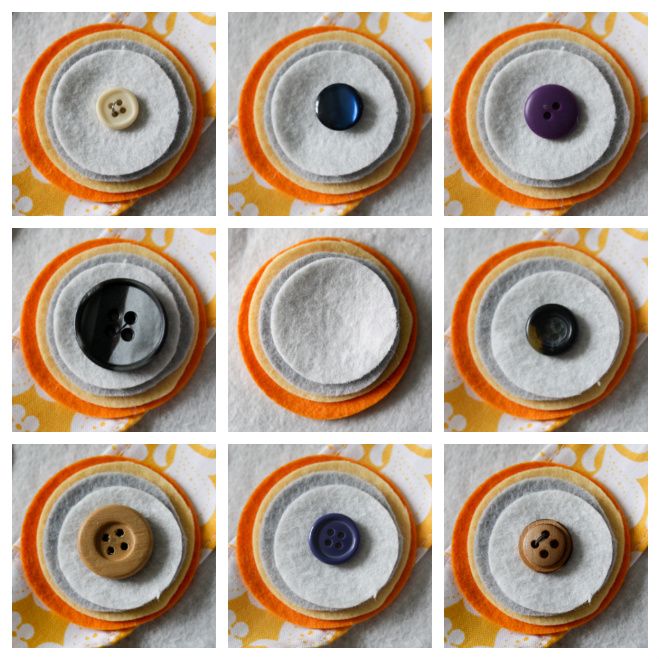
And now: buttons.
Play around and pick your combo. (Just about any time I see nine squares together like this I think of the Brady Bunch intro. There’s Alice in the middle.)
Now the trick to placing the flower (or circles or whatever) is to fold the headband in half and place it comfortably close to the fold.
Stitch ‘er on.
And for added stability, add a few extra stitches wherever you can hide them.
Sneaky.
It’ll look a little cattywompus on the back, but that’s okay.
Snip snip.
I had to.
Alright, we’ve made a headband.
Voi-freaking-la!
And now, the part that we’ve all been waiting for.
The modeling of the new headband by Baby Chubby Cheeks.
Go ahead, swoon. Over the baby, the tutorial or the headband, I’m not picky.
Are your retinas bleeding?
Happy Thursday!


>This is AWESOME! Thanks :)
>you are killing me! funniest tutorial ever. i love how the baby headband tute is like 8 times longer than the laying down hardwood floors tutorial. i wish i had this when i first started sewing. there is no such thing as too many instructions or pics i think. this is awesome. and i always try to just wait until the end to snip my threads for maximum efficiency but i never can because it drives me nuts. also, i was in perfect sync with you on the "like sew" pun. love it and hazel rocks the heck out of these!
>You officially need to do more tutorials. Love the over abundance of pictures and the sewing tips you snuck in there. Bookmarked!!
>Thank you for the morning smile. the tutorial was a great read and I will be making these next week.
Have a blessed day!
>Awesome! Can't wait to make them! Thanks!
>you are amazing an hilarious!! i am so wishing i had a baby girl to make these for! your model is perfect in everyway, and it is people like me who LOVE a detailed tutorial like that! :)
>Oh my gosh you are too funny! Snip, Snip!! HA
>So since I am pregnant with a baby girl and because of your awesome tutorial, I really want to run out right now and buy a sewing machine!!! And do you know that I am so in love with the quilt you made that Oliver is all snuggled in in your entry, "This Moment"? I WANT ONE!!! And I desperately need to take some sewing classes…or I can just learn from your tutorials! :o)
>Oh, I love a little funny in the mornings. Even better, this funny came up with instructions on how to be neato. Now all I need to do is learn to sew a straight line, find my iron, and google what 'seam allowance' means.
Adorable finished product! Loved this one!
>You know what your detailed tutorial makes me think of? PW's super detailed recipes. I always skip those and read off the shortened PDFs instead. Do you have one of those? :)
Joking!
Really cute! I'll have to try my hand at this. I do have a niece, after all.
inalm!
>ok. question! how did you measure her head? did you go around the top like around her forehead like at the Dr's office or did you measure down where the headband sits? AND… since I don't have a little girl and would be making these as gifts any ideas? should I just go ahead and ask moms to measure for me? thanks so much. super cute and I must say your model is adorable!
>aw so adorable, i wish i had a baby girl :) so cute :)
>Thank you, THANK YOU, thank YOU, ThaNk YoU! That was the perfect tutorial, for me at least! I would read a direction and before scrolling down would say a little pray that you had an accompaniment picture to go with it. YOU DID! EVERY stinkin' TIME! I know I shouldn't need sooooo much guidance but I do and it helped and now my little peach will have headbands!
>Nice work, Rae. So good to see up-close photos of my machine. Keep sewing! Mom
>Yay, going to have to try this! Have you worked with knit? It's my new fave for headbands…avoids all the awkward hair bumps, although Hazel looks like she has a bit of time for those. ;-) (consider yourself lucky…I never knew headbands were so problematic!)
PS, she's seriously adorable.
PPS, I'm jealous of that circle cutter thing. Love it.
>Cute! If you will now kindly reveal your secret to getting your baby to leave her darling headbands *on,* I'll be all set–Fiona will have none of it!
>I so can't wait to make some of these. Super cute and they have got to be cheap!
>That is one awesome tutorial!!! Your writing style is very engaging…. made me smile :)
>I love this!
I'm launching my first linky party next tuesday. It's for projects that cost less than $10 and take less than 20-30 minutes. Would you consider linking up with me on my first linky party endeavor? Thanks!
http://sweetfloweret.blogspot.com
Tina
this is when i knew.
you’re cute. always nice to be able to pinpoint it :)
I can’t wait to do this!! Thank you!!!!!!!!!!! My Granddaughter Alice will be rockin’ some headbands soon!
I’ve had this tutorial on my favorites and pinterest since you posted it last year. I’ve finally made the headband! It didn’t turn out as cute as yours, but it’s one completed craft I did without calling my mother for advice on using the sewing machine :)
I know this is an older tutorial, but I cannot even tell you how much I enjoyed your sense of humor as well as the great tutorial for the headband! Well done!
thanks, Inga :)